How to connect to the University of Tsukuba VPN Services
using L2TP/IPsec VPN protocol
Here we will explain how to connect to the University of
Tsukuba VPN Services using the L2TP/IPsec VPN Client
attached to the OS.
Since L2TP/IPsec VPN Client is an accessory to OS like
Windows, Mac, iOS, Android by default, the initial VPN
connection settings can be made relatively easier compared
to methods using OpenVPN.
For that reason, we recommend you try using L2TP/IPsec
first, before using OpenVPN. Some network environment and
firewalls will block the L2TP/IPsec communications. In those
cases, please try using OpenVPN.
Connection Parameters of L2TP/IPsec
If you already know how to make settings in each OS, you
can enter the following setting parameters and connect with
L2TP/IPsec protocol.
|
Item |
Value |
Notes |
|
Host Name (server name) |
campus-vpn.cc.tsukuba.ac.jp |
|
|
User Name (Account) |
University of Tsukuba Unified Authentication
System ID
(the 13 digit bar code number on the back
of the student/staff ID card) |
Please
click
here for information on the Unified
Authentication System. |
|
Password |
Password for the University of Tsukuba
Unified Authentication System |
Confirm that the current password and ID are
correct. |
|
Secret (Pre-shared Key) |
vpn
(Half-width lower-case letters 3 character
fixed) |
Please be careful, as the Secret (Pre-shared key) is
different as the Password. This is common for all
users. |
Select the OS
How to set on Windows (L2TP/IPsec VPN)
Here, we will explain how to make VPN connections using
L2TP/IPsec VPN Client, a standard feature in Windows XP, 7,
8, RT, Server 2003, 2008, 2012.
On this page, we will explain using the Windows 7 screen
as an example. The basic setting methods on OS like Windows
XP, Windows 8 or later are the same, however, some
operations are slightly different.
1. 初期設定 (最初の 1 回のみ)
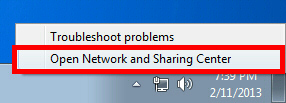
Right-click the network icon in the bottom right of the
Windows screen and click "Open Network and Sharing
Center."
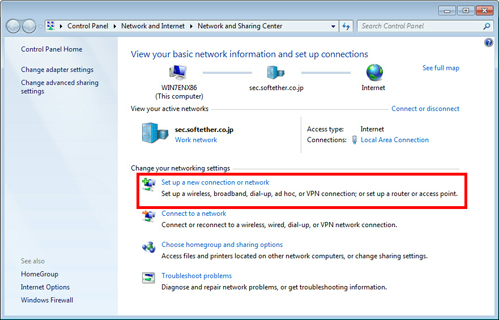
After the network and sharing center is open, click
"Set up a new connection or network."
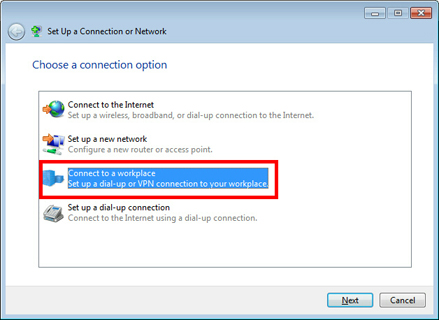
Select "Connect to a workplace."
Select "Use my Internet connection (VPN)."

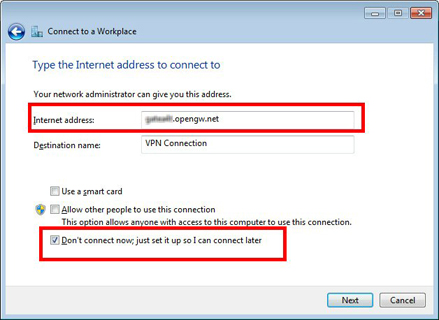
Enter "campus-vpn.cc.tsukuba.ac.jp" in
the "Internet Address" field.
|
Item |
Value |
|
Internet Address |
campus-vpn.cc.tsukuba.ac.jp |
After entering the "Internet Address" field, always check
the "Don't connect now; just set up so I can connect
later" box at the bottom of the screen and click
"Next."
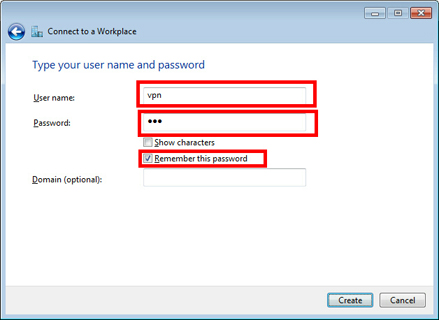
When a screen to enter your User Name and Password is
displayed, enter the fields as follows.
|
Item |
Value |
Notes |
|
User Name (Account) |
University of Tsukuba Unified Authentication
System ID
(the 13 digit bar code number on the back
of the student/staff ID card) |
Please
click
here for information on the Unified
Authentication System. |
|
Password |
Password for the University of Tsukuba
Unified Authentication System |
Confirm that the current password and ID are
correct. |
After entering your password, check the "Remember
this Password" box and click "Next."
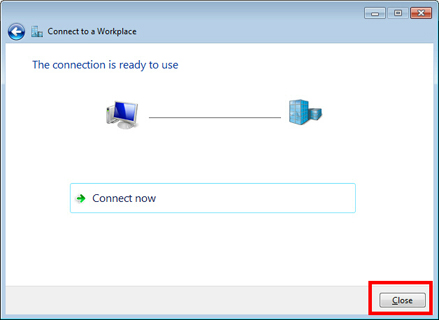
When "The connection is ready for use" is displayed,
click "Close." Don't click "Connect now" at
this point yet.
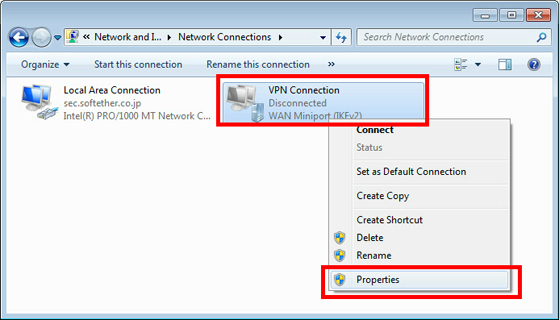
From the "Network and Sharing Center" screen, click on
"Change adapter settings."

The currently defined VPN connections will be displayed.
Right-click the VPN connection setting you created in the
previous step and click "Properties."
When the Properties are displayed, click on the
"Security" tab (with Windows XP, click on the
"Network" tab). Select "Layer 2 Tunneling Protocol
with IPsec (L2TP/IPSec)" from the "Type of
VPN" drop-down list.
プロパティが表示されたら、「セキュリティ」タブをクリックしてください
(Windows XP の場合は「ネットワーク」タブをクリックしてください)。「VPN の種類」のドロップダウンリストから「IPsec
を利用したレイヤー 2 トンネリング プロトコル (L2TP/IPsec)」を選択します。
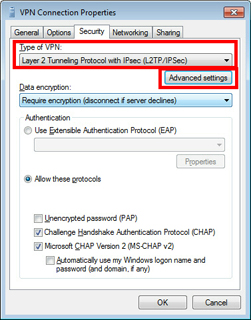
Next, click the "Advanced settings"
button. (In Windows XP, click the "IPsec Settings" on the
"Security" tab.)
The following screen will appear. Click "Use preshared
key for authentication" and input "vpn"
(3-letters) in the "Key" field.
|
Item |
Value |
Notes |
|
Secret (Pre-shared Key) |
vpn
(Half-width lower-case letters 3 character
fixed) |
Please be careful, as the Secret (Pre-shared key) is
different as the Password. This is common for all
users. |

After the above settings are completed, click
"OK" and close the "Advanced Properties" screen.
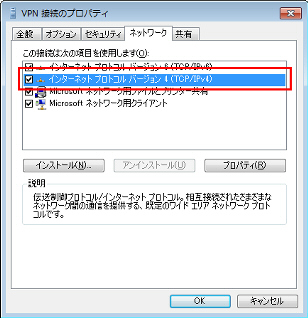
Next, open the "Network" tab. The
following screen will be displayed. Select "Internet
Protocol Version 4 (TCP/IPv4)" and click on
"Properties."
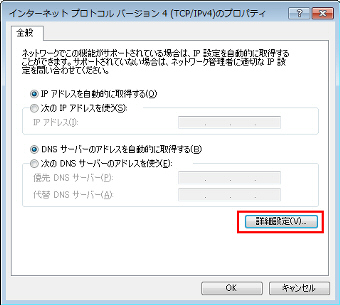
The IPv4 properties screen will open. Click on "Advanced
settings."
The "Advanced TCP/IP Settings" screen will open. Remove
the check from the "Use default gateway on remote
network" check box.
If the check is left inside "Use default gateway on
remote network," only communications with hosts
configured for VPN communication inside the University of
Tsukuba campus can be made, and Internet communications with
any host will not be possible. Please always remove the
check mark.
After the above settings are completed, click "OK"
three times and close the properties screen.
2. Connecting to the VPN server
After clicking and activating the created VPN connection,
the following screen will be displayed.
The previously entered values should be saved inside the
User Name and Password fields. If they are not saved, please
enter as follows.
|
設定項目 |
設定内容 |
備考 |
|
User Name |
University of Tsukuba Unified Authentication
System ID
(the 13 digit bar code number on the back
of the student/staff ID card) |
Please
click
here for information on the Unified
Authentication System. |
|
Password |
Password for the University of Tsukuba
Unified Authentication System |
Confirm that the current password and ID are
correct. |
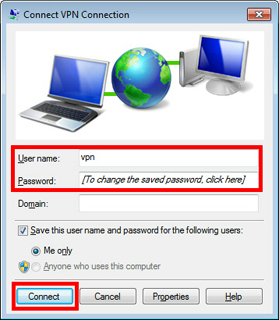
If you click "Connect," the VPN connection will start.
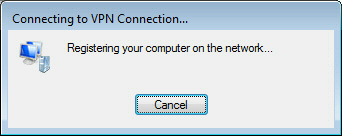
A screen like the one below will be displayed during VPN
connections. If an error occurs during the connection,
please check if the type of VPN in the explanation above is
set to L2TP/IPsec, and recheck to see if the Preshared key
has been set correctly.
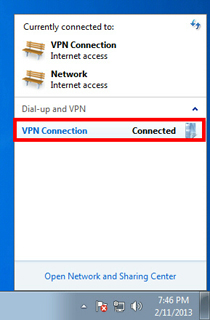
When the VPN connection is done, a VPN connection icon
will be displayed when the network icon in the bottom right
of the Windows screen is clicked as in the following
diagram, and the status will become "Connected."
Furthermore, to make subsequent VPN connections, you will
only have to click this screen's icon.
How to connect on Mac (L2TP/IPsec VPN)
Here, we wil explain how to make VPN connections using
L2TP/IPsec VPN Client, a standard feature in Mac OS X.
On this page, we will explain using the Mac OS X Mountain
Lion screen as an example. The basic setting methods are the
same as with other versions, however, some operations are
slightly different.
The screen shots below are all taken from the English
version of Mac OS X. When using Mac OS X with other
languages, a different language than that of these screen
shots will be displayed. Even in such cases, by reading the
following explanations, you should be able to make the
settings easily.
1. Initial configuration (Only once the first time)
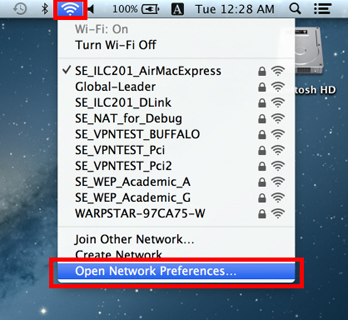
Click the network icon in the top right of the Mac
screen. After the menu is displayed, click on "Open
Network Preferences..."
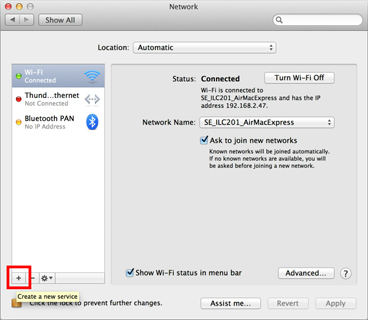
The network settings screen will be displayed. Click the
"+" button in the bottom left.
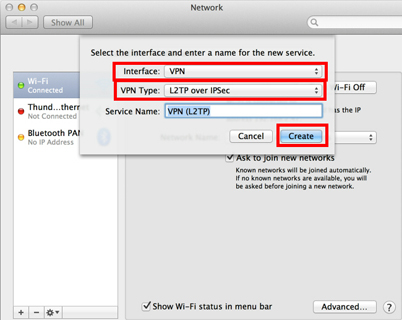
A screen like the one in the following diagram will be
displayed. From "Interface," select
"VPN" and from "VPN Type" select
"L2TP over IPSec" and click
"Create."
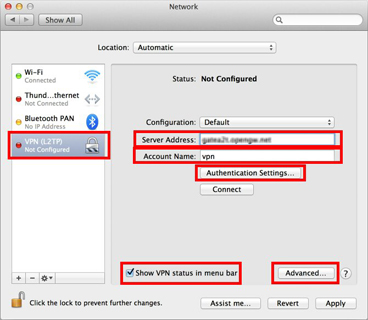
A new L2TP VPN connection setting will be created and the
settings screen will be displayed. Please set as follows.
|
Item |
Value |
Notes |
|
Server Address |
campus-vpn.cc.tsukuba.ac.jp |
|
|
Account Name |
University of Tsukuba Unified Authentication
System ID
(the 13 digit bar code number on the back
of the student/staff ID card) |
Please
click
here for information on the Unified
Authentication System. |
Next, click the "Authentication Settings..."
button.
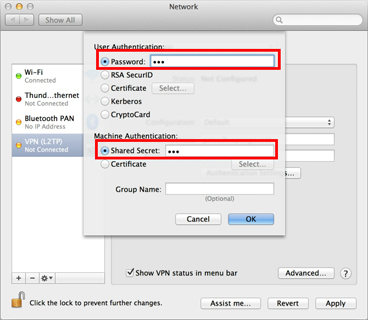
After the Authentication Settings screen is displayed,
enter as follows.
|
Item |
Value |
Notes |
|
Password |
Password for the University of Tsukuba
Unified Authentication System |
Confirm that the current password and ID are
correct. |
|
Secret (Pre-shared Key) |
vpn
(Half-width lower-case letters 3 character
fixed) |
Please be careful, as the Secret (Pre-shared key) is
different as the Password. This is common for all
users. |
After entering, click "OK."
After the screen returns to its previous state, check
"Show VPN status in menu bar" and click on
the "Advanced..." button.
After the Advanced settings screen is displayed, remove
the check from "Send all traffic over VPN
connection" and click "OK."
If the check is left inside "Send all traffic over
VPN connection," only communications with hosts
configured for VPN communication inside the University of
Tsukuba campus can be made, and Internet communications with
any host will not be possible. Please always remove the
check mark.

After the screen returns to the previous VPN connection
settings screen, click "Connect" and VPN
connections will start.
2. VPN Connection
VPN connections can be made anytime by opening the VPN
connection settings screen as explained above and clicking
"Connect." As well, connections can also be
made from the VPN icon displayed in the menu bar.
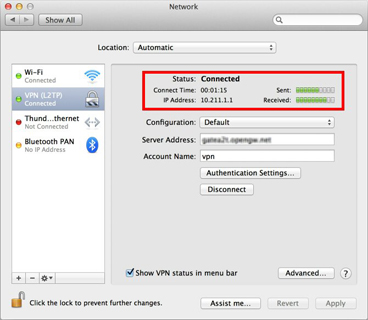
During VPN connections, the VPN connection settings
screen will display "Connected" as shown
below, and connection times and IP addresses in the VPN will
also be displayed.
How to connect on iPhone / iPad (L2TP/IPsec VPN)
Here, we will explain how to make VPN connections using
L2TP/IPsec VPN Client, a standard feature in the iPhone /
iPad.
On this page, we will explain using the iOS 6 screen as
an example. The basic setting methods are the same as with
other versions, however, some operations are slightly
different.
The screen shots below are all taken from the English
version of iOS. When using iOS with other languages, a
different language than that of these screen shots will be
displayed. Even in such cases, by reading the following
explanations, you should be able to make the settings
easily.
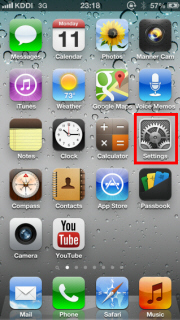
1. Initial configuration (Only once the first time)
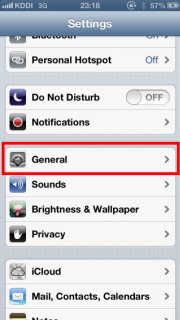
From the iOS main screen, activate the "Settings"
app.
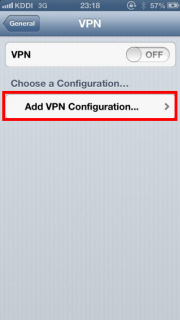
From "General," open "VPN"
and tap on "Add VPN Configuration..."

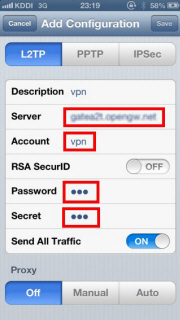
A new L2TP VPN connection setting will be created and the
settings screen will be displayed. Please enter as follows.
|
Item |
Value |
Notes |
|
Host Name (server name) |
campus-vpn.cc.tsukuba.ac.jp |
|
|
User Name (Account) |
University of Tsukuba Unified Authentication
System ID
(the 13 digit bar code number on the back
of the student/staff ID card) |
Please
click
here for information on the Unified
Authentication System. |
|
Password |
Password for the University of Tsukuba
Unified Authentication System |
Confirm that the current password and ID are
correct. |
|
Secret (Pre-shared Key) |
vpn
(Half-width lower-case letters 3 character
fixed) |
Please be careful, as the Secret (Pre-shared key) is
different as the Password. This is common for all
users. |
|
Send All Traffic |
OFF |
If this setting is left ON, only communications with
hosts configured for VPN communication inside the
University of Tsukuba campus can be made, and
Internet communications with any host will not be
possible. Please always leave the setting "OFF." |
After entering, tap on "Save."
2. VPN Connection
VPN connections can be made any time after a VPN
connection setting has been added.
After selecting the VPN connection setting, click the
"OFF" button and VPN connections will
start.
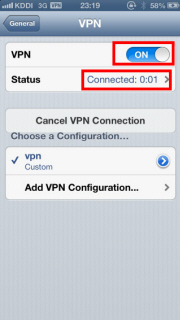
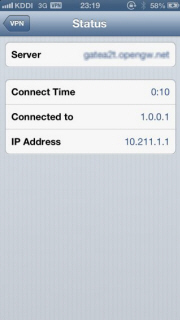
During VPN communications, the current VPN connection's
duration, destination and IP address in the VPN will be
displayed in the "Status" screen. There
will be cases when the destination IP may display "1.0.0.1."
However, this is normal behavior.
How to connect on Android (L2TP/IPsec VPN)
Here, we will explain how to make VPN connections using
L2TP/IPsec VPN Client, a standard feature in Android .
On this page, we will explain using the Android 4.x
screen as an example. The basic setting methods are the same
as with other versions, however, some operations are
slightly different. As well, there are cases when the
screens have been customized by the cell phone or tablet
manufacturer.
The screen shots below are all taken from the English
version of Android. When using Android with other languages,
a different language than that of these screen shots will be
displayed. Even in such cases, by reading the following
explanations, you should be able to make the settings
easily.
1. Initial configuration (Only once the first time)
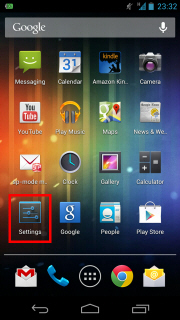
Activate the "Settings" app in Android.
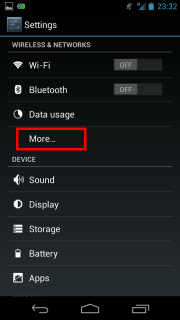
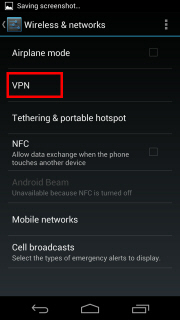
From "Wireless & Networks" category, open
"More..." and then open "VPN."
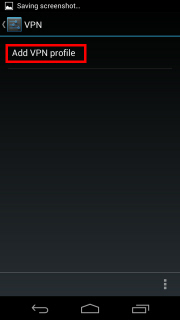
Click "Add VPN profile" and create a new
VPN connection setting.
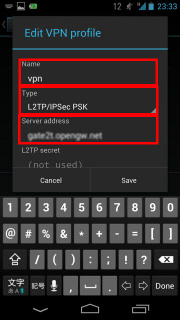
The edit screen for the new VPN connection setting will
be displayed. Please enter an appropriate name (like "vpn")
in the "Name" field and in the
"Type" field select "L2TP/IPSec PSK."
Other setting items will be entered as follows.
|
Item |
Value |
Notes |
|
Server Address |
campus-vpn.cc.tsukuba.ac.jp |
|
|
Type |
L2TP/IPsec PSK |
Please be careful because connections cannot be made
if anything besides this is selected. |
|
IPsec pre-shared key |
vpn
(Half-width lower-case letters 3 character
fixed) |
Please be careful, as the Secret (Pre-shared key) is
different as the Password. This is common for all
users. |
|
User Name (Account) |
University of Tsukuba Unified Authentication
System ID
(the 13 digit bar code number on the back
of the student/staff ID card) |
Please
click
here for information on the Unified
Authentication System. |
|
Password |
Password for the University of Tsukuba
Unified Authentication System |
Confirm that the current password and ID are
correct. |
|
Forwarding routes |
130.158.0.0/16 133.51.0.0/16 |
Since Android L2TP Client does not support RFC3442,
this setting must be made manually.
VPN connections cannot be made if you forget this
setting. |
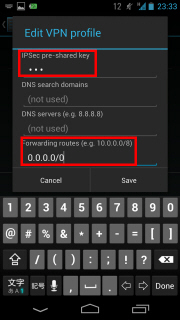
Scroll further down the setting items and enter the
following items. Depending on the Android version, an entry
field will not be displayed unless "Show advanced
options" is checked, so please insert a check.
Enter "vpn" (3 letters) in the
"IPSec pre-shared key" field.
Enter "130.158.0.0/16 133.51.0.0/16" in
the "Forwarding routes" field. Please be
careful because VPN communications cannot be made unless the
Forwarding routes are properly input.
After all the items are entered, tap "Save"
to save the VPN connection setting.
2. VPN Connection
VPN connections can be made any time after a VPN
connection setting has been created. After tapping the VPN
connection setting, the following screen will be displayed.

Here, the "Username" and "Password" must be designated
only for the first time.
|
Item |
Value |
Notes |
|
User Name (Account) |
University of Tsukuba Unified Authentication
System ID
(the 13 digit bar code number on the back
of the student/staff ID card) |
Please
click
here for information on the Unified
Authentication System. |
|
Password |
Password for the University of Tsukuba
Unified Authentication System |
Confirm that the current password and ID are
correct. |
If you tap on "Connect," the VPN
connection will start.
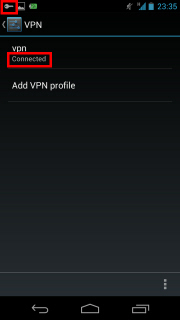
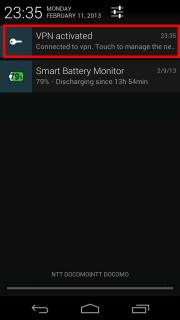
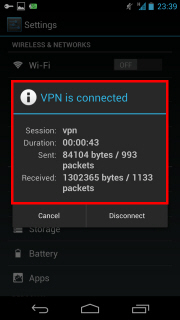
When the VPN connection is complete, "Connected"
will be displayed below the VPN connection settings. As
well, the status display screen will display "VPN
activated" and by tapping on it, the status of the
VPN connection will be displayed.
If the VPN connection of L2TP/IPsec fails
- The Preshared key is "vpn" (3
letters). Please check if you have not forgotten to
enter the Preshared key.
- There is a possibility that the firewall of your
local network above is blocking 2TP/IPsec communication.
In this case, L2TP cannot be used.
In the case of Windows, please try
using SoftEther VPN
Client, and for Mac, iOS, Android, please
try OpenVPN.
|